Capturing Motion with Long Exposure Photography

A heavy rainstorm hits a busy downtown intersection. Cars rush through puddles, headlights streaking through the dark, while pedestrians become ghostly blurs against the static storefronts. This isn't a mistake; it's a deliberate choice. This post explains how to master long exposure photography to capture motion, from silky waterfalls to light trails. You'll learn the technical settings, the gear requirements, and the creative techniques needed to turn movement into art.
What Gear Do You Need for Long Exposure?
You need a sturdy tripod, a remote shutter release, and a camera with manual controls. Without a stable base, your entire image will be a blurry mess rather than a controlled study of motion. Even the slightest vibration from your hands will ruin the shot when your shutter stays open for several seconds.
First, don't skмimp on the tripod. I've seen people try to balance a heavy DSLR on a cheap, flimsy plastic stand, and it always ends in heartbreak. If you're shooting in a windy environment, look at something like the Manfrotto carbon fiber series for extra stability. You want something that can hold your weight without wobbling.
Next, consider a Neutral Density (ND) filter. If you want to shoot a waterfall in broad daylight, you can't just use a fast shutter speed—you need to block light. An ND filter acts like sunglasses for your lens. It allows you to keep the shutter open for longer without overexposing the sensor.
- Tripod: Essential for preventing camera shake.
- ND Filters: Reduces light to allow longer shutter speeds during the day.
- Remote Trigger: Prevents vibration from your finger pressing the button.
- Intervalometer: Useful for time-lapse sequences.
If you're just starting out, you might already have some of this. You don't need a $2,000 setup to get good results, but you do need a solid foundation. A stable tripod is non-negotiable.
How Do You Calculate the Right Shutter Speed?
The right shutter speed depends entirely on whether you want to blur the motion or freeze it. You determine this by looking at the speed of your subject and the amount of light available in your environment.
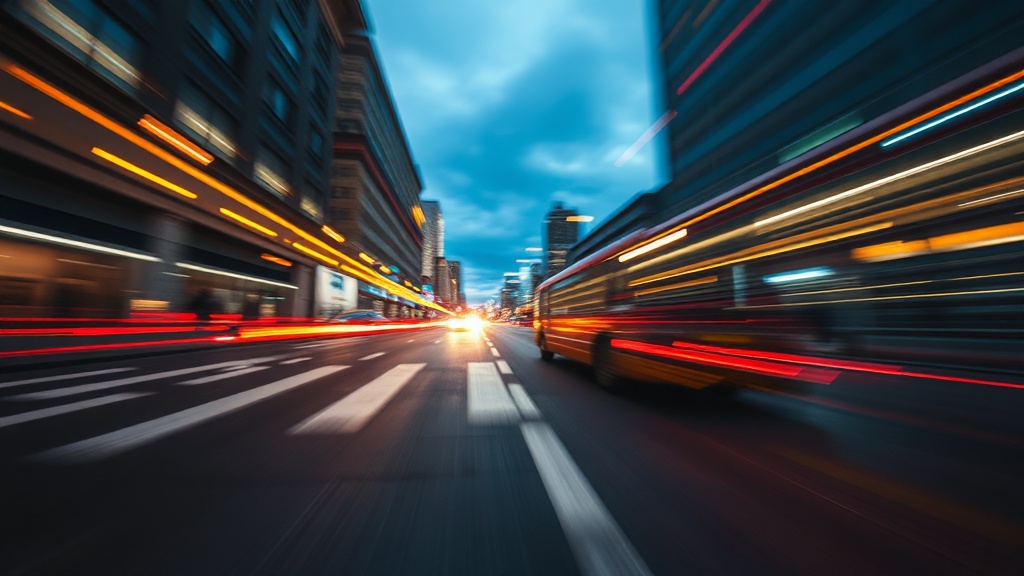
Let's look at a few common scenarios. If you're shooting a waterfall, a shutter speed of 0.5 to 2 seconds often creates that classic "silky" look. If you want the water to look like a flat, white sheet, you might go up to 10 or 20 seconds. However, if you're shooting light trails from cars on a highway, you'll likely need 15 to 30 seconds to capture the full movement of the vehicles.
This is where the exposure triangle comes into play. You aren't just changing one thing; you're balancing shutter speed with aperture and ISO. If you increase your shutter speed time, you must decrease your aperture (higher f-stop number) or lower your ISO to prevent the image from being way too bright.
Here is a quick reference for common subjects:
| Subject | Desired Effect | Typical Shutter Speed |
|---|---|---|
| Ocean Waves | Soft, misty water | 1 - 5 Seconds |
| City Traffic | Long light trails | 10 - 30 Seconds |
| Moving Clouds | Streaky, dramatic sky | 30+ Seconds |
| Star Trails | Circular star paths | 30 Minutes+ |
It's a bit of a balancing act. If you go too long without an ND filter, your image will be a white blob. If you go too short, the motion won't actually look "blurred"—it'll just look like a regular photo with a bit of motion blur.
What Are the Best Settings for Night Photography?
For night shots, set your camera to Manual (M) mode, use a low ISO (usually 100 or 200), and a narrow aperture (f/8 to f/16). This ensures the stars or city lights stay sharp while allowing the shutter to stay open long enough to gather light.
One mistake I see constantly is people leaving their ISO too high. They want a bright image, so they crank the ISO to 3200 or 6400. This introduces massive amounts of digital noise (graininess). Instead, keep your ISO low and let the shutter do the work. The longer the shutter stays open, the more light the sensor collects. It's a trade-off between light sensitivity and time.
When shooting at night, you'll also want to use a timer or a remote. Even the act of pressing the shutter button can cause a tiny vibration that ruins a 20-second exposure. Most cameras have a 2-second delay setting—use it. It's a simple way to ensure the camera is perfectly still before the shutter actually opens.
If you're feeling adventurous, you can look into "star trails." This involves taking dozens of long-exposure shots and stacking them in post-processing. You can learn more about the physics of light and how sensors work via Wikipedia's entry on long exposure. It's fascinating stuff once you get the hang of it.
Common Mistakes to Avoid
The biggest pitfall is wind. You might have a heavy tripod, but if a gust of wind hits your camera, that 30-second exposure is going to be blurry. I always check the wind direction before I even take the tripod out of my bag. If it's a windy day, I'll hang my camera bag from the center column of the tripod to add extra weight and stability.
Another issue is "light leakage." If you're shooting a bright scene with a long exposure, the light might bleed into the edges of your frame. This is why the quality of your lens matters. A cheap lens might have more "flare" or "ghosting" when hit by bright light sources during a long exposure.
Don't forget to check your histogram. A histogram is a graph that shows you the distribution of light in your image. In long exposure, it's very easy to "clip" your highlights—meaning the brightest parts of your photo (like the sun or a street lamp) become pure white with no detail. If your histogram is pushed all the way to the right, you've gone too far.
Lastly, watch your battery life. Long exposures are hungry. If you're taking a shot that lasts 4 minutes, your camera is working hard. If you're out in the cold, your battery will drain even faster. I always carry a spare battery in my pocket—not in the camera bag—to keep it warm and ready to go.
Once you've mastered these basics, the world starts looking different. You'll see a busy street not as a chaotic mess, but as a potential canvas of light. Go out, experiment with different shutter speeds, and see what happens when you slow down time.
Steps
- 1
Set your camera to Manual mode
- 2
Use a sturdy tripod to prevent camera shake
- 3
Select a slow shutter speed based on desired motion
- 4
Use a remote shutter release or timer to avoid vibration