Creating Dreamy Bokeh with Wide Aperture Settings

A high-end prime lens can cost more than a used car, yet most people use them just to take sharp pictures of their kids. While sharpness is great, the real magic happens when you intentionally lose focus to create "bokeh"—that creamy, soft, aesthetic blur in the background. This post breaks down how to manipulate your aperture, focal length, and distance to master depth of field and create professional-grade bokeh in your photography.
What is Bokeh and How Do You Create It?
Bokeh is the aesthetic quality of the out-of-focus areas in a photograph, specifically the way the lens renders points of light. You don't just "get" bokeh; you craft it by managing the relationship between your lens, your subject, and your background. It's the difference between a distracting, busy background and a dreamy, soft-focus backdrop that makes your subject pop.
To achieve this, you need to focus on three main variables. First, your aperture setting. Second, your focal length. Third, the physical distance between your subject and the background. If you want to understand the physics behind how light bends through glass, you can check out the technical breakdown of bokeh on Wikipedia.
Most beginners think a wide aperture is the only way to get blur. That's not true. You can actually get a shallow depth of field with a narrower aperture if you move close enough to your subject. It's a balancing act of physics and timing.
The Role of the Aperture
The aperture is the opening inside your lens that controls how much light hits the sensor. In the world of mastering the exposure triangle, the aperture is your most powerful tool for controlling depth of field. A wide aperture (a low f-number like f/1.8 or f/2.8) creates a very shallow depth of field. This means only a tiny slice of your image is in focus, while everything else melts away.
Think of it like this: the lower the number, the more "open" the lens is. A Canon EF 50mm f/1.8 STM is a perfect example of an affordable lens that excels at this. It allows you to let in massive amounts of light and create that soft-looking background that portrait photographers crave. (Just don't get too frustrated if your focus falls slightly off the eyes—it happens to the best of us.)
Which Lens is Best for Bokeh?
Lenses with longer focal lengths and wider maximum apertures produce the most dramatic bokeh. If you want that "creamy" look, you generally want a telephoto lens or a fast prime lens. A 85mm or 135mm lens will almost always produce more background blur than a 35mm lens, even if they both have an f/1.8 aperture.
Here is a quick comparison of how different lens types typically behave when it comes to background blur:
| Lens Type | Focal Length | Bokeh Potential | Best Use Case |
|---|---|---|---|
| Wide Angle | 16mm - 35mm | Low | Landscapes/Architecture |
| Standard Prime | 50mm | Medium | Street/General Purpose |
| Portrait Prime | 85mm - 135mm | High | Portraits/Headshots |
| Telephoto Zoom | 200mm+ | Very High | Wildlife/Sports |
If you're shopping for gear, don't just look at the focal length. Look at the maximum aperture. A 70-200mm f/2.8 lens from Sony or Nikon will give you much more aggressive background compression and blur than a 70-300mm f/4.5-5.6 kit lens. The price difference is huge, but so is the visual result.
The Importance of Focal Length
Focal length doesn't just change how much of the scene you see; it changes how the background looks. Longer focal lengths create "compression." This makes the background appear closer to the subject and much more blurred. This is why many professionals swear by the Nikon Z 85mm f/1.2 or similar high-end glass. The compression makes the subject feel isolated from the environment in a way that a wide lens simply can't replicate.
How Can I Get Better Bokeh in My Portraits?
To get the best bokeh, you must maximize the distance between your subject and the background while minimizing the distance between your camera and your subject. It's a game of spatial awareness. If your subject is standing right against a brick wall, you won't get much bokeh regardless of your lens. Move them ten feet away from that wall, and suddenly, the wall disappears into a soft wash of color.
Here is a checklist to follow when you're out in the field:
- Set your aperture to the lowest possible f-number: Use f/1.4, f/1.8, or f/2.8.
- Increase your focal length: Zoom in or use a longer lens to compress the scene.
- Increase subject-to-background distance: Get your subject away from trees, walls, or buildings.
- Get closer to your subject: The closer the lens is to the subject, the shallower the depth of field.
- Look for light sources: Small lights or sunlight peeking through leaves create "bokeh balls."
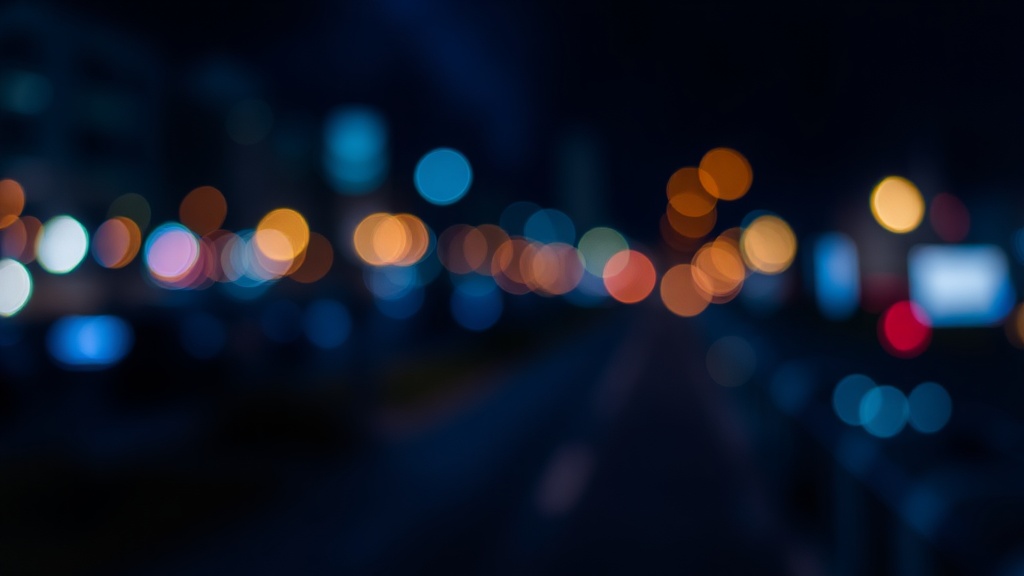
Don't forget about the light source. If you have small points of light in the background—like street lamps or sunlight hitting leaves—the lens will render these as soft, glowing orbs. This is often what people mean when they talk about "beautiful bokeh." It's a visual texture that adds depth and a sense of magic to the shot.
Watch Your Focus Accuracy
There's a catch. When you're shooting at f/1.2 or f/1.8, your depth of field is razor-thin. If you focus on the tip of a person's nose, their eyes might actually be out of focus. This is a common pitfall. Always use single-point AF or eye-detection AF to ensure you're hitting the right spot. You might want to revisit finding the right light to make sure your subject is well-lit enough for the camera to track their eyes accurately.
If you find your photos are too blurry, you might be pushing the aperture too far. It's a fine line between "dreamy" and "unfocused." If the subject's eyes are soft, the photo is a fail. Always check your histogram and your focus points in post-processing or on your LCD screen before moving to the next shot.
Experiment with different light-colored backgrounds. A bright, out-of-focus background often looks much cleaner than a dark, messy one. If you're shooting in a park, look for areas where the sun creates "specular highlights" through the foliage. Those little dots of light will turn into beautiful, glowing circles behind your subject. It's a simple trick, but it works every single time.
Go out and test these settings with whatever lens you have. Even a basic kit lens can produce some decent blur if you get the distance and focal length right. Don't be afraid to fail a few shots to find that perfect, creamy aesthetic.
Steps
- 1
Select a lens with a wide maximum aperture
- 2
Set your camera to Aperture Priority mode
- 3
Choose the lowest f-number possible
- 4
Increase the distance between subject and background
- 5
Decrease the distance between camera and subject