Finding the Right Light for Portrait Photography

You will learn how to identify, manipulate, and control light to create compelling portraits. This guide covers natural light techniques, artificial light setups, and how to avoid common mistakes like harsh shadows or flat lighting. Understanding light is the difference between a snapshot and a professional portrait.
What is the Best Light for Portrait Photography?
The best light for portrait photography is soft, diffused light that minimizes harsh shadows on the subject's face. While many beginners gravitate toward the bright sun, that's often a mistake. Direct sunlight creates high-contrast shadows under the eyes and nose—a look most people find unflattering.
If you're shooting outdoors, look for "Golden Hour." This is the period shortly after sunrise or before sunset when the light is warm and low in the sky. The light is much more forgiving during these times. You can read more about the physics of light and color temperature on Wikipedia to understand why this happens.
If you can't shoot during Golden Hour, find shade. A shaded area provides a natural softbox effect. The light is still bright enough to see detail, but it's much more even. It’s a great way to ensure your subject looks their best without needing expensive gear.
Types of Light Quality
Light generally falls into two categories: hard and soft. It's a simple distinction, but one that changes everything about your image.
- Hard Light: Characterized by sharp, well-defined shadows. Think of a single bare bulb or the midday sun. It adds drama and texture but can be brutal on skin imperfections.
- Soft Light: Characterized by gentle transitions between light and shadow. Think of an overcast day or light bouncing off a large white wall. It hides wrinkles and creates a flattering glow.
How Do You Use Natural Light for Portraits?
Using natural light involves positioning your subject in relation to a light source like a window or the sun. You don't need a studio to get professional results; you just need to be observant.
Window light is a classic for a reason. It’s predictable and easy to control. If you place your subject at a 45-degree angle to a window, you get a beautiful "Rembrandt" lighting effect. This creates a small triangle of light on the cheek—a technique used by painters for centuries.
When working with natural light, watch the direction. If the light is coming from behind the subject (backlighting), you'll get a beautiful rim light around their hair, but their face might be too dark. You might need a reflector to bounce some light back onto their face. A simple piece of white foam board from a craft store works perfectly for this.
One thing to keep in mind is the Golden Hour effect. The light changes rapidly. You might start a shoot with perfect light, and ten minutes later, the sun has dropped too low. Always check your light meter or your camera's histogram to ensure you aren't losing detail in the shadows.
The Importance of the Exposure Triangle
Before you start chasing light, make sure you understand how your camera processes it. If your exposure is off, no amount of good lighting will save the shot. You should probably review Mastering the Exposure Triangle if you aren't comfortable with ISO, aperture, and shutter speed yet.
What Are the Most Common Lighting Setups?
Professional photographers use specific patterns to direct the viewer's eye and create depth. These setups can be achieved with natural light or with artificial tools like strobes or continuous lights.
| Lighting Setup | Description | Mood/Effect |
|---|---|---|
| Rembrandt Lighting | Light hits one side of the face, creating a triangle on the shadow side. | Dramatic, classic, and moody. |
| Butterfly Lighting | Light is placed directly in front of and above the subject. | Glamorous; creates a small shadow under the nose. |
| Split Lighting | Light hits exactly half of the face, leaving the other half in shadow. | High tension, intense, and edgy. |
| Loop Lighting | A small shadow is cast next to the nose on the cheek. | Natural and flattering for most face shapes. |
If you decide to move into artificial lighting, you'll need to decide between speedlights and continuous lights. Speedlights (like those from Sony or Canon) are great for freezing motion, while continuous lights (like LED panels) allow you to see exactly where the shadows fall before you click the shutter.
Controlling the Light
Once you have a light source, you need to control it. You aren't just a photographer; you're a sculptor of light. You use tools to shape it.
- Diffusers: These soften the light. A translucent cloth or a softbox spreads the light out, making it less "pointy."
- Reflectors: These bounce light back into the shadows. It’s an easy way to fill in dark areas without adding a new light source.
- Flags: These are used to block light. If the light is too bright or hitting a part of the subject you don't want, use a flag to create shadow.
Don't overcomplicate things early on. Even a simple white bedsheet can act as a massive diffuser if you're working near a window. The goal is to manipulate the light to suit the story you're trying to tell.
Common Mistakes to Avoid
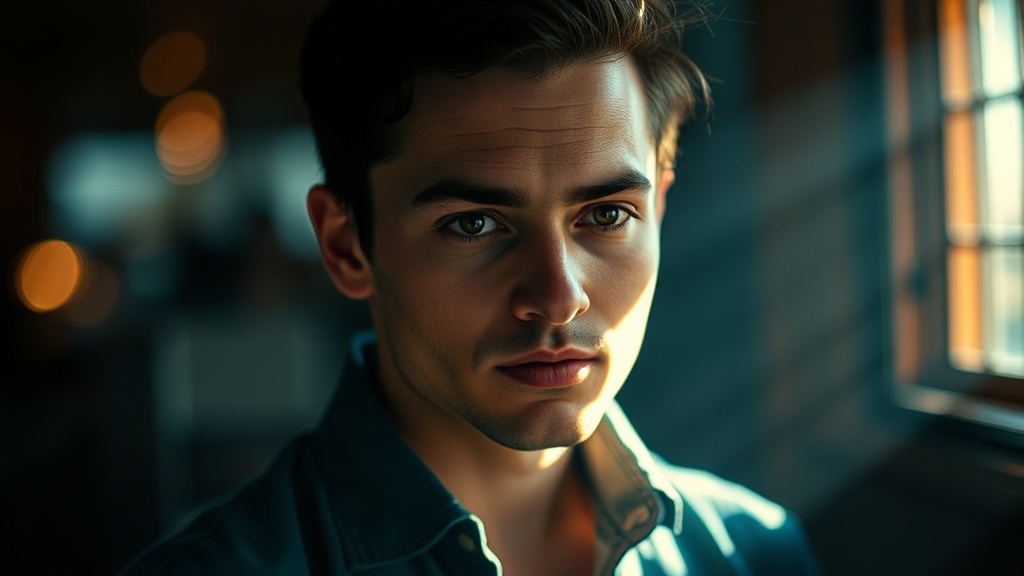
The most frequent mistake I see is ignoring the "catchlight." A catchlight is that tiny reflection of the light source in the subject's eyes. Without it, the eyes can look "dead" or flat. Even in a dark room, a tiny bit of light in the eyes makes the subject look alive and engaged.
Another mistake is neglecting the background. You might have perfect lighting on your subject, but if there's a bright light source right behind them, they will appear as a silhouette. Always check what's happening behind your subject. Is there a bright window? A street lamp? A distracting shadow? If so, move your subject or your light to fix it.
Lastly, watch out for "raccoon eyes." This happens when your light source is too high above the subject, casting heavy shadows in the eye sockets. It's a common issue with overhead indoor lighting. To fix this, either move the light lower or use a reflector to bounce light back up into the face.
If you find yourself struggling with motion blur while trying to get the perfect light, you might want to look into Capturing Motion with Long Exposure Photography to understand how shutter speeds and light interact over time.
Experiment with different angles. A slight change in the position of your light can completely change the mood of the portrait. Don't be afraid to move around. The best photographers are the ones who aren't afraid to get on the floor or climb a chair to get the perfect angle.